React part 10
We talk about how to implement a loading bar and handling fetch errors in React.
Loading Bar:
our “home” component should look like this at this point:

First up, we are going to add a piece of state for the loading text, like so:

we add the “isloading” state and make the initial state for that, set to “true”. (On line 6)

Here on line 21, we are setting up the “isloading” variable with some ampersand symbols. With a “div” and some text saying “Loading…” which will appear when data is loading. Back in the state, it is set to true always until turned off, which we do in line 15. (basically, isLoading is true until you do the fetch which at that point if the fetch works it will turn the state of isLoading to false. this is done on line 15.)
To clarify what's happening on line 21 we are saying, is loading true or false? it's true, so anything after “&&” will run but, if it were false in the original state, nothing would run because anything after the ampersand symbols will not run…. we talked about this in the last lecture.
At the end of all that, your home page should look like this:

Fetch Errors:
All alright, here we are simply going to add a “.catch()” in our fetch call(I don't really use fetch that often but, I feel it's important to know the basics.)
All this does is if there's a network error, it will tell us what went wrong!

We simply call the catch() method, with an arrow function in it, and consoloe.log any error that presents its self. To make this happen we will have to stop the JSON server for this to error out.
so control + C the server to cancel it!
Now, if we go back to the browser and refresh, we will see an error message like this:

It continues to run “loading,” and it shows our “error message,” which says failed to fetch if you look in the console. So that works! This really only works for connection errors!
However, it will not work if the endpoint doesn't exist or if the request is denied because it's still reaching the server, and the server is still sending a response object back to us. We can check those other types of errors by doing an “if” statement. Before I show you that, I want to show you what the response in a fetch gives you, just so we know what we are playing with:

On line 11, We will just console.log() the “response object” which we get back from the endpoint. In the browser you should see this:

In the console, you should notice the response object, and there is a key that says “ok:” and set to “true,” we will be using that for our other error handling.(if it was a bad response it would say false)
now we add the information to the if statement like so:

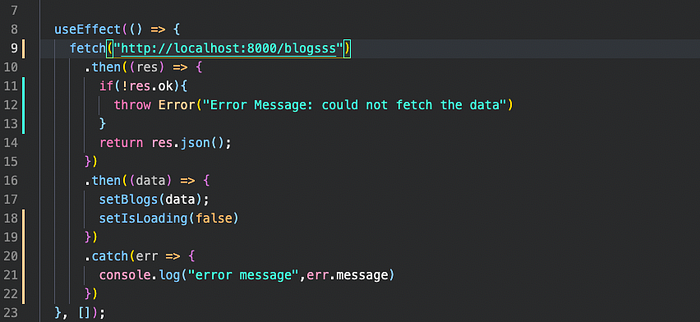
looking on line 11, we have our if statement, and it reads “!res. ok”(This means that if the response. ok returns true do nothing and skip over the thrown Error, but if its “false,” throw that error)
Here I purposely mess up the URL on line 9 so we could see the error:
We get the error in the console down below:

It works, Horray, it says “could not fetch data”!! Now, we want to set that up so it goes to state so the output gets to the browser and the user.
OK, first, let us build a state for our error’s:

simply on line 7, we just set up the error and set the state to null for now.
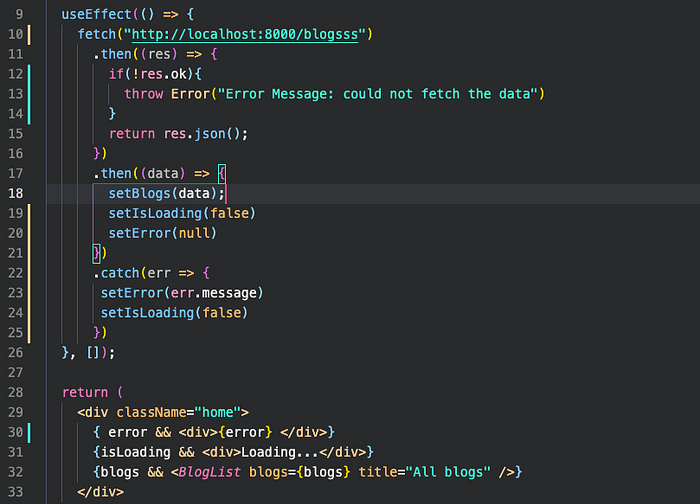
Here we go to line 23, we take out the console.log, and we switch it to setError(). Which is setting the error state to whatever the error message will be at that time. We then output it on line 30, doing the same as the other ones and outputting the error state if something goes wrong.
It should look like this in the browser:

Yeaaaa it worked!!! On line 24, we will also change the setIsLoading to false because it's not actually loading anything after it throws that error so we don't want to through the user off waiting by waiting forever.

Finally, we need to set setError to null if the data does come thru correctly, it will eliminate seeing the errors all the time.
OK, that's all, at the end of all this your code should look like this:

I hope you all learned something ill see you all next week!
The other lessons for React….
React here:
React part 1 (How to start a react app)
React part 2 (components and dynamic values)
React part 3 (Multiple components and small styling)
React part 4 (click events with functions and react dev tools)
React part 5 (link to useState hook and how to output lists in react)
React part 6 (Props and reusable components)
React part 7 (passing functions as props and use effect hook)
React part 9 (Fetching data with JSON)
If you want to check out javascript….
check out some javascript here:
Javascript 1 (variables and data types)
Javascript 2 (numbers and strings)
Javascript 3 (bracket notation and 20 diff string methods)
Javascript 4 (functions and how they work)
Javascript 5 (hoisting, comparison operators, and if-else statements)
Javascript 6 (diff. Equal signs, null, and undefined)
Javascript 7 (logical operator, &&, || and ternary operators)
Javascript 8 (switch statements and arrays)
Javascript 9 (commonly used arrays in javascript)
Javascript 10 (Math. And parseInt Usage)
Javascript 11 (for loops and nested for loops)
Javascript 12(while loops and for..in and for..of loops)
Javascript 13(8 diff array methods)
Javascript 14(objects and ways to use objects)
Javascript 15(JSON and fetch request)
